It is possible to perform operations using different databases on SQL Server. While doing this easily on the same server, Linked Server is used to access different servers on the network.
Linked Server is a structure established when it is desired to transfer data between different databases on the same instance, between databases on different servers or from a different source.
So what exactly is this linked server?
Linked Server is a feature that allows you to read data or run queries from a remote data source with SQL Server. You can perform JOIN etc. operations on tables between databases A and B as you can on tables in the same database. The databases we are talking about can be on the same server or on different servers.
How to use Linked server?
We will perform our example with 2 different databases on the same server. Let’s create 2 databases for our example, one named AdventureWorks2014 and the other named Aryasoft.
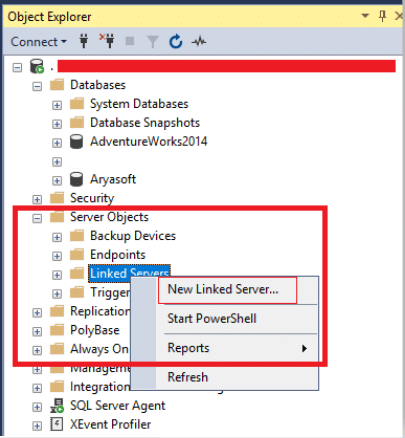
After creating our databases, we open a new Linked Server creation screen by right clicking on Linked Servers under the Server Objects menu in the left menu and clicking on New Linked Server.
The window that opens will be as follows. Here we enter the name of our connection in the Linked server section. Since I am working on a local machine, I am still connecting to localhost as the address.
If you are working with a remote database, then you need to change your connection address accordingly.
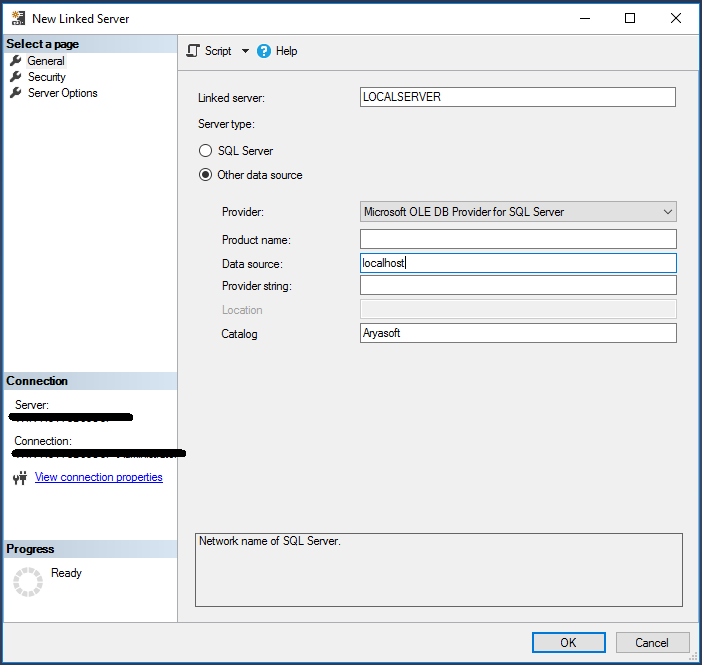
The Data Source field must be filled in.
<If we examine the above fields in order;
Linked Server : The field where we specify a name for the Linked Server we created.
Provider : Here you must select a provider for the database you want to connect to. Since we will work with SQL Server, we choose Microsoft OLE DB Provider for SQL Server.
Product name : You can give this section the name you want. My recommendation would be to write its version if you are working with a database on a different server. Ex: MSSQL 2012 Standard
Data source : The address of the database server we will connect to
Provider String : Here you can enter the information of the other database or Excel file you want to connect to. For example: Excel 8.0 for Excel versions 97-2003.
Catalog : The name of the database we want to connect to.
Then switch to the Security tab. If the operation will be performed on the same server, select “Be made using login’s current security context”. But if the database we will connect to is on a different server, after selecting the “Be made using this security context” field, the information of a user who is authorized to access the database we will connect to should be written in the “Remote login” and “With Password” fields.
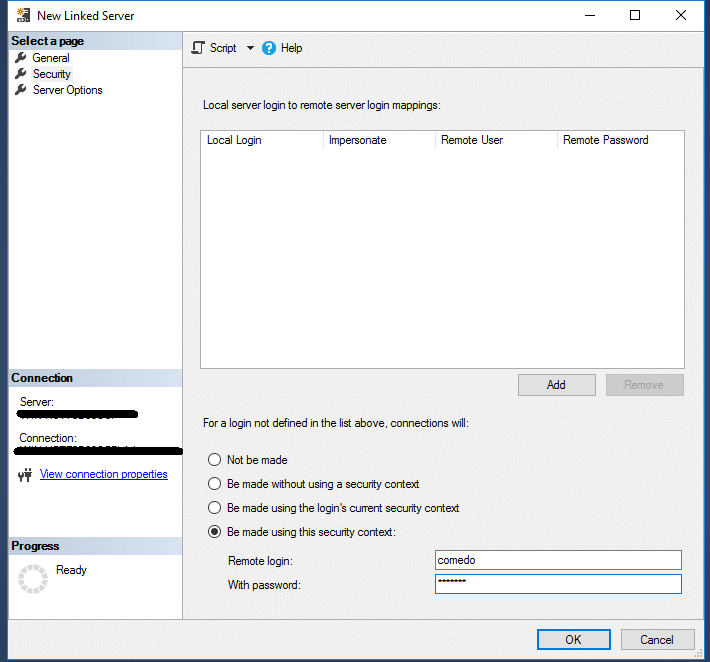
You may have noticed that there are also Local login, Remote user and Remote password fields in the Security section. The Local login section here is the area where you can select/write the existing users in the database you created on the linked server. The Remote user and password section is where you enter the user and password of the user on the server you want to access remotely. Since both of our databases are local, I don’t need to make any settings.
If we examine the options here closely;
- Be made without using a security context : It is used for connections that do not require any authentication process such as Excel file. However, when working with a different SQL Server, it works in the same way as Not be made and may cause you to get an error.
- Be made using the login’s current security context : This option is used to login to the remote server with local login credentials. For example, if the Windows Authentication option is used on the local server, the remote server will also try to log in with the information used in the Windows Authentication option.
- Be made using this security context : In this option, the server will be logged in with the information entered in the remote login and remote password field. If the information entered here is not available on the server you are trying to connect to, you will see an error screen that there is no user.
After filling in and saving our information, we are ready to run the query. There are two different methods of running a query. One is the method we call OpenQuery and the other is called Four-part Name. Let’s first look at the Four-part Name example and then the OpenQuery example and end our article.
Four-part Name :
SELECT Name FROM [LOCALSERVER].ECommerce.dbo.Product
OpenQuery :
SELECT * FROM Openquery(LOCALSERVER, ‘select * from Product’)
Finally, click on the Server Options tab. For the connection, it will be enough to mark the top five options as True as shown in the picture below.
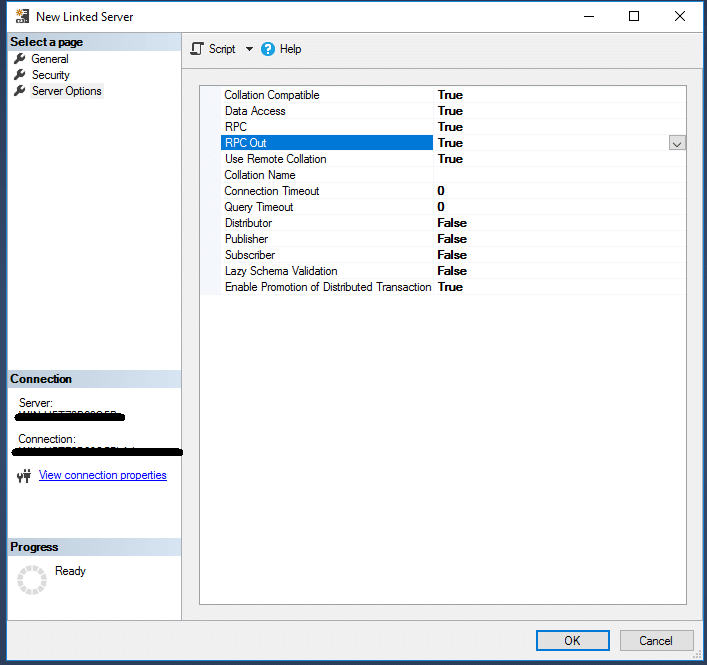
This way it is called OK. Linked Servers are created with the name given under it.

How to write a query on Linked Server?
Let’s write a Query.
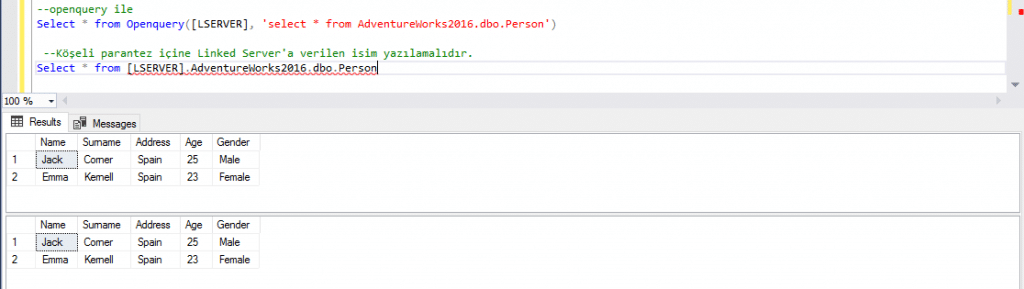
–openquery
Select * from Openquery([LSERVER], ‘select * from AdventureWorks2016.dbo.Person’)
–The name given to Linked Server should be written in square brackets.
Select * from [LSERVER].AdventureWorks2016.dbo.Person